
Instead of scrolling a folder of images, you and anyone you share the tour with can stand in a room, look around, and see the photos, videos, and notes that were taken right there — pinned to the wall, ceiling, or piece of equipment they document.
Tours are built on top of your floor plans, so the layout of the property is the map you move through.
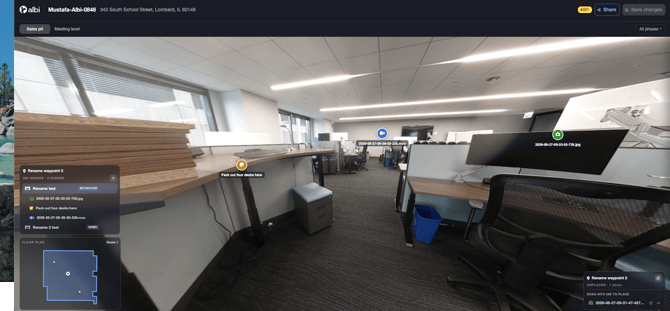
Tours never copies or moves your files. Scenes and pins point at the photos, videos, and notes already attached to your project. Removing something from a tour changes nothing in the project's documents.
There is exactly one tour per project. It's created automatically the first time anyone opens it — there's no "create a tour" step.
Terms to know
Three words come up constantly, and they mean specific things:
| Term | What it means |
|---|---|
| Waypoint | A pin your technician drops on the floor plan while sketching a room. It marks a physical spot in the property. Photos, videos, and notes captured at that spot hang off it. |
| 360 scene | One 360° photo attached to a waypoint. A single waypoint can hold several — for example, the same corner shot before and after demo. |
| Pinned content | A regular photo, video, or note placed at a specific point inside a 360 scene, so it sits on the wall or object it documents. |
What you need before you start
Two things have to be in place:
- Interactive Tours needs to be enabled for your company. If it isn't, the View Tour button won't appear on your project at all, and the tour address won't load even if someone sends you a link. It's switched on by default for newer accounts; older accounts may need it enabled. Contact us if you don't see it.
- 360 capture has to be enabled for your company. This is a separate enablement that controls whether technicians can capture 360 photos on their mobile devices. If it's off, no 360s will ever arrive — so a tour will open, but it will be empty.
If you're missing either one, reach out and we'll confirm what's active on your account.
Opening a tour
- Open the project you want to view.
- Go to the Floor plans tab.
- Click View Tour at the top right of the floor plans grid.
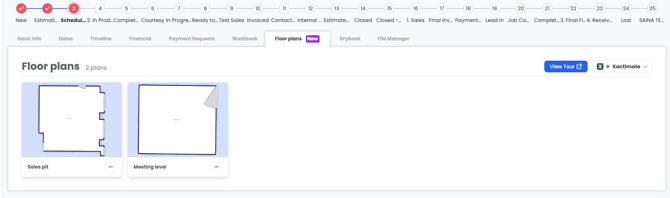
The tour opens in a new browser tab, so your project stays open behind it.
Edit mode vs. view mode
The tour opens in edit mode, marked by an amber Edit badge in the header. In edit mode you can place media, rename things, manage phases, save, and share.
A View badge, shown in blue, means look-only: no dragging, renaming, saving, or sharing. Anyone opening a shared link always sees view mode. It's also a safe way to inspect a tour without any risk of changing it.
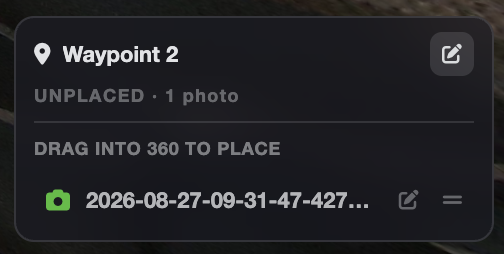
The tour screen at a glance
The tour takes over the whole browser window — no Albi navigation bar, sidebar, or footer. That's deliberate, to give the 360 room to breathe. Closing the tab returns you to your project.
Header (top)
- Project name, address, and claim number
- Floor tabs — one per floor plan, for switching levels
- Phase filter — set to All phases by default
- Mode badge — Edit or View
- Share menu
- Save changes button

Floor plan mini-map (bottom left)
A simplified drawing of the rooms on the current floor, with a pin for every waypoint that has 360s. Click a pin or a room to jump there. Hover a pin to see its name.
Scene panel (above the mini-map)
Shows the current waypoint's name, a count of its 360 scenes, and every 360 at that waypoint with its pinned content listed underneath. This is also where the Compare phases button lives.
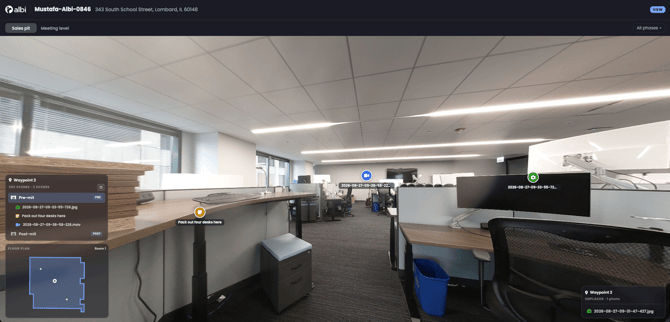
Unplaced panel (bottom right)
Everything on the active waypoint that hasn't been pinned into one of its 360s yet, with a summary line such as 2 photos · 1 video · 3 notes. Treat it as a to-do list — once an item is placed anywhere, it leaves this panel.
Two things deliberately never appear here:
- The 360s themselves — they are the scenes, not things you pin into scenes.
- PDFs and any file we can't identify as a photo or video — these can't be pinned.
- Look around — drag inside the 360.
- Zoom — scroll, or pinch on a touchscreen.
- Change floors — use the floor tabs in the header.
- Change rooms — click a pin or room on the mini-map, or click a navigation hotspot inside the 360.
- Switch between 360s at the same waypoint — the view crossfades rather than reloading.
Next steps
- To get 360s and media into a project in the first place, see Capturing 360 Scenes and Media in the Field.
- To arrange them into a tour, see Building Your Tour: Media, Renaming, and Phases.
- To send the tour to an adjuster or homeowner, see Sharing Your Tour.
- If something isn't working, see Interactive Tours: Troubleshooting and FAQ.