
Why the Split Matters
The two are not just an organising convenience — the equipment recommendations are calculated differently for each:
- Air movers are calculated per room, from that room's affected floor, wall and ceiling areas.
- LGR dehumidification is calculated per chamber, from the combined volume of every room in the chamber and the chamber's water class, because a chamber is dried as one air space.
So how you group rooms into chambers changes the dehumidification requirement, while the measurements inside each room change the air mover requirement.
The Chambers Page
Open the Drylog tab on the project, then the Chambers sub-tab.
| Where | What it holds |
|---|---|
| Left column | Every chamber on the job, and the Create Chamber button. Click a chamber to select it. |
| Chamber Details card | The selected chamber's name, class, category and starting readings. Click Edit to change them. |
| Rooms card | The rooms in that chamber, each showing its air mover count. + Create adds one. |
| Equipment Recommendation card | The chamber's dehumidification and its rooms' air movers. |
| Notes and Images cards | Notes and photos for that chamber specifically, separate from the site-level ones. |
Note: The Delete button at the top right removes the chamber you have selected, along with its rooms. Check which chamber is highlighted in the left column before using it.
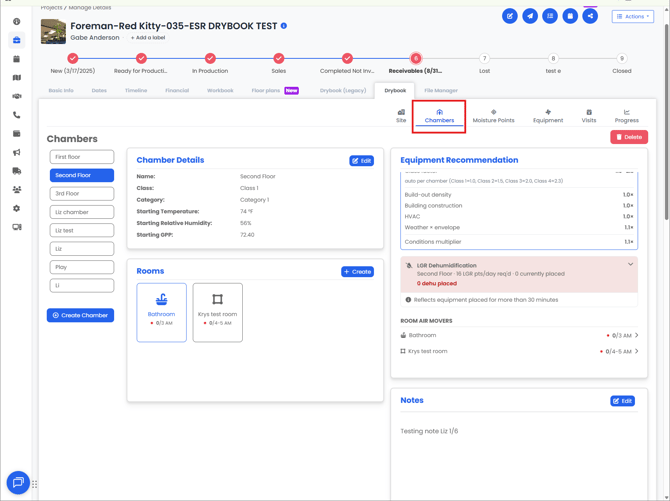
Chambers
A chamber is a zone or contained area within the structure. It might be a single room or a combined space, for example "Living Room / Dining Room".
Creating a Chamber
Click Create Chamber in the left column and fill in the form.
| Field | What it records |
|---|---|
| Name | What you are calling the chamber, for example "First floor" |
| Class | How much of the chamber is affected. Leave on Auto or choose a class. |
| Category | How contaminated the water is. |
| Temperature (°F) | Starting temperature in the chamber |
| Relative Humidity (%) | Starting relative humidity in the chamber |
| Starting GPP | Calculated from the temperature and relative humidity |
Click Save to create the chamber, or Cancel to discard it. You can create as many chambers as the job needs.
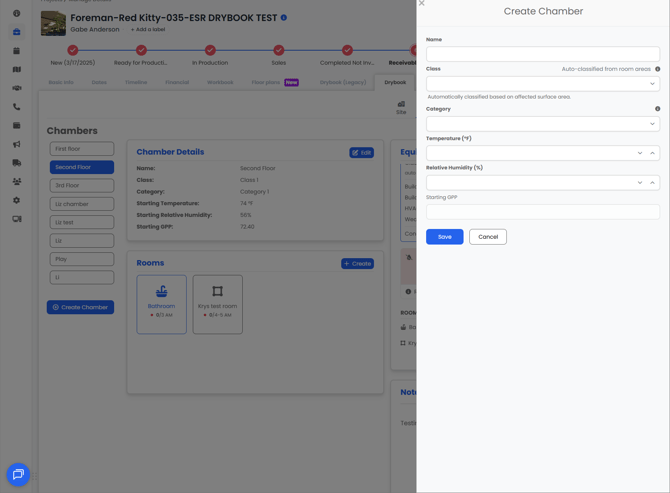
Note: On the Chamber Details card these read as Starting Temperature and Starting Relative Humidity. They are the same values — the form drops the word.
Water Class
The chamber's water class is what the dehumidification requirement is divided by, so it is worth getting right. It can be set manually or left on Auto.
On Auto, Albi works it out from how much of the chamber's surface area is affected:
| Affected surface area | Class on Auto |
|---|---|
| Under 5% | Class 1 |
| 5% to 40% | Class 2 |
| Over 40% | Class 3 |
Note: Exactly 5% and exactly 40% both read as Class 2 — the boundaries belong to the middle band.
Two things about Auto are worth knowing:
- The percentage is chamber-wide, not per room. A large dry room dilutes a small soaked one. The same soaked room can land a chamber on Class 3 next to one dry room of equal size, or Class 2 next to nine times as much dry surface.
- Auto never picks Class 4. Even a chamber that is soaked throughout derives Class 3. Class 4 describes deeply held moisture in materials like hardwood, plaster and concrete, which cannot be read off areas and percentages. Choose it manually if the job calls for it.
Any edit to a room's dimensions or affected areas re-derives the class immediately. Setting a manual class stops that movement.
The dropdown carries the thresholds with it, so you do not have to remember them: Auto, Class 1 (< 5% of surface area), Class 2 (5–40% of surface area), Class 3 (> 40% of surface area) and Class 4 (Specialty – deeply bound water).
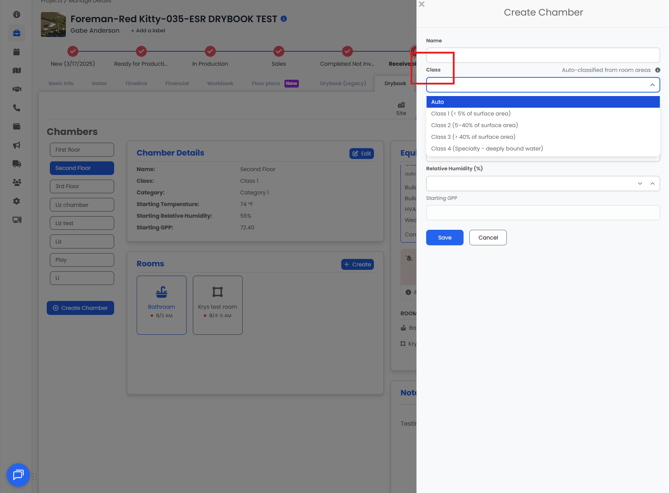
Note: A chamber with no rooms, or with rooms that have no dimensions yet, has nothing for Auto to classify. It will have no class, no dehumidification tile and no dehumidification block in the report until a room gets dimensions or you choose a class manually.
Tip: The i icon beside the Class field opens a full explanation of all four classes without leaving the form.
Water Category
Category is a different thing from class, and the two get mixed up constantly. Class is how much of the chamber is affected. Category is how contaminated the water is.
| Category | Describes | Typical sources |
|---|---|---|
| Category 1 | Clean water, no significant health hazard | Broken supply pipe, rainwater, clear tub overflow |
| Category 2 | Visibly contaminated, could cause illness if ingested or contacted | Washing machine run-off, toilet overflow, broken aquarium |
| Category 3 | Grossly contaminated, pathogenic to toxic | Sewage, flood seawater, septic backup, contaminated ground water |
Unlike class, category is never worked out automatically — you always choose it.
Tip: The i icon beside the Category field opens the same explanation inside the form.
Rooms
Each chamber holds one or more rooms. A room is where the measurements live.
The Rooms card on the Chambers page shows every room in the selected chamber as a tile. Each tile carries the room name, its air mover count as placed over required, and a status dot in the same colours as the recommendation tiles.
Creating a Room
Click + Create on the Rooms card. The form has three sections below the room name.
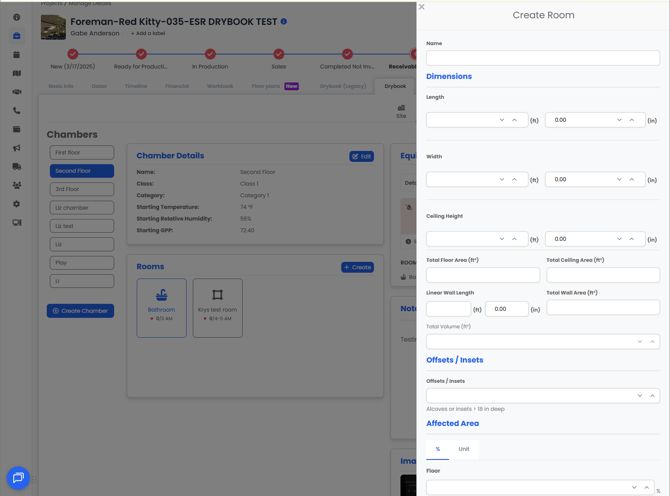
Dimensions
Enter the room's measurements and Albi works out the rest.
| You enter | Albi fills in |
|---|---|
| Length, in feet and inches | Total Floor Area (ft²) |
| Width, in feet and inches | Total Ceiling Area (ft²) |
| Ceiling Height, in feet and inches | Linear Wall Length |
| Total Wall Area (ft²) | |
| Total Volume (ft³) |
Note: The five figures on the right are filled in for you and cannot be typed over, even though they look like ordinary fields. If one of them is wrong, change the dimension it came from.
Offsets / Insets
A count of the alcoves and insets in the room. The form states the threshold under the field: alcoves or insets more than 18 in deep.
Affected Area
Switch between the % and Unit tabs depending on how you want to give the affected portion — as a percentage of each surface, or as an area. Either way you enter three figures: Floor, Wall and Ceiling.
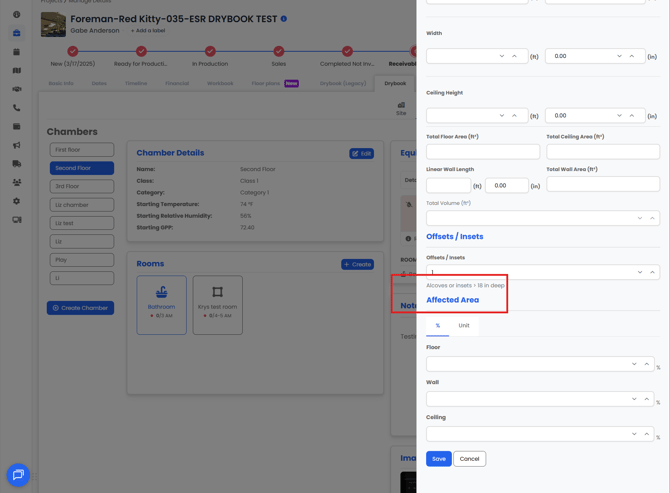
Click Save to create the room, or Cancel to discard it.
Offsets and Insets
An offset or inset is a recess deeper than 18 in (45 cm) — an alcove, a bay, a closet opening. Each one adds an air mover to the room's recommendation, because air will not turn the corner into a recess on its own.
Note: Recesses shallower than the threshold should not be counted. Doing so raises your recommendation for no reason, and it is one of the two most common causes of a room asking for more air movers than it should. The other is leaving all three affected percentages at 100% when only part of the room is wet.
Moving a Room to a Different Chamber
A room can be moved from one chamber to another. When you do, its history moves with it, and both chambers' dehumidification figures are worked out again — the one losing the room and the one gaining it.
The Equipment Recommendation Card
Each chamber's recommendations sit on the right of the Chambers page, so you can see the effect of how you have set the chamber up without leaving the page.
LGR Dehumidification shows the chamber's requirement and what has been placed, for example "1,191 LGR pts/day req'd · 1 currently placed", with the headline figure beneath it. A line under the block reads "Reflects equipment placed for more than 30 minutes" — the placed figure is the most equipment that was on site at one time, not a live reading.
Room Air Movers lists every room in the chamber with its own placed and required figures.
The Detailed Method Toggle
The Detailed Method switch sits at the top of this card. Turning it on reveals the five building conditions — build-out density, building construction, HVAC assists drying, prevailing weather and building envelope — and a breakdown of the multipliers they produce:
| Row | What it shows |
|---|---|
| Class factor | ×1.0 to ×2.3, set automatically per chamber from its class (Class 1 = 1.0, Class 2 = 1.5, Class 3 = 2.0, Class 4 = 2.3) |
| Build-out density, Building construction, HVAC, Weather × envelope | The multiplier each selection contributes |
| Conditions multiplier | The four condition factors combined |
Click Save on the Detailed Method panel to apply changes.
Note: Although the switch appears inside one chamber's card, the detailed method is a Drylog-wide setting — turning it on for one chamber turns it on for all of them. Only the class factor varies per chamber.
Note: Prevailing weather, building envelope, build-out density and building construction are the same stored values as the Building section of Site Information. Editing them here edits them there, and the other way round. HVAC assists drying exists only on this card.
Adding Equipment from a Room
Click a room in the Room Air Movers list to open Add Drylog Equipment for that room.
The panel repeats both recommendations that apply, so you can see what you are working against while you pick: the chamber's LGR dehumidification, and that room's air movers. Each shows what is required, how many are currently placed, and the headline placed figure, with the same note that it reflects equipment placed for more than 30 minutes.
| Field | Notes |
|---|---|
| Placement Date | Prefilled with the current date and time. Use the calendar and clock icons to change it. |
| Removal Date | Optional. Leave it blank while the equipment is on site. |
| Equipment | Search, or tick units from the list. It is grouped into Used in this project and All, and each unit is labelled In Use or Available. |
Click Save to place the equipment, or Cancel to discard.
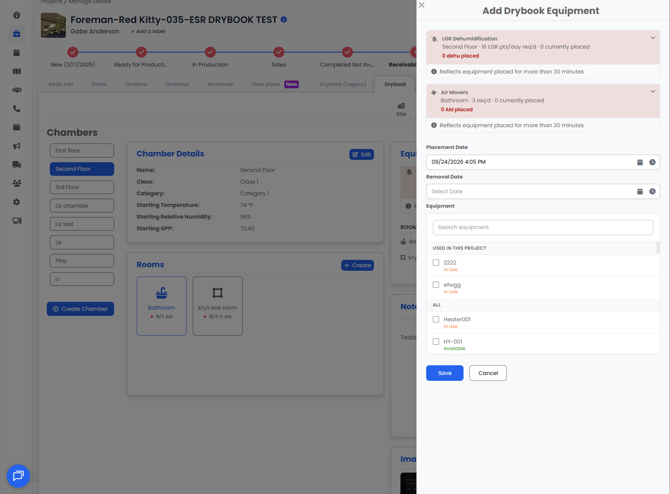
Note: This is the same picker you get from the Equipment tab, opened straight onto the room you clicked. For the full calculations, worked examples and what changes a recommendation, see the equipment recommendations article.
What Chambers and Rooms Feed
Once a chamber has rooms with dimensions and affected areas, Albi uses them to:
- Calculate air mover and dehumidification recommendations against the IICRC S500
- Build the chamber and room sections of the Drylog report
- Give an adjuster the figures behind the equipment you placed
For the full calculations, worked examples and what changes a recommendation, see the equipment recommendations article.
Frequently Asked Questions
What's the difference between class and category?
Class is how much of the chamber is affected — it drives the dehumidification requirement, and Albi can work it out for you. Category is how contaminated the water is, from clean supply water through to sewage, and you always choose it yourself.
The chamber class changed on its own.
The chamber is on Auto, and an edit to a room's dimensions or affected areas moved the affected percentage across a class boundary at 5% or 40%. Setting the class manually stops this.
A chamber is soaked everywhere but Auto shows Class 3, not Class 4.
Correct. Auto never selects Class 4, because Class 4 describes deeply held moisture in materials that cannot be read off areas and percentages. Choose Class 4 manually if the job calls for it.
I don't see a dehumidification tile for a chamber.
The chamber has no water class resolved yet, so there is nothing to divide by. Give it rooms with dimensions so Auto can work one out, or set a class manually.
Do I have to work out the floor, wall and ceiling areas myself?
No. Enter the length, width and ceiling height, and Albi fills in the floor, ceiling and wall areas, the linear wall length and the volume.
Why can't I type in the floor, wall or ceiling area?
Those figures are always calculated from the room's dimensions, so there is nothing to type. To change them, change the length, width or ceiling height.
Should I enter the affected portion as a percentage or as an area?
Whichever you have to hand. The % and Unit tabs in the Affected Area section switch between the two, and you give the same three figures either way: floor, wall and ceiling.
Should this be one chamber or two?
Dehumidification is calculated per chamber from the combined volume, so rooms that are being dried as one air space belong in one chamber. Rooms that are separated and drying independently belong in separate chambers.
My room is asking for far too many air movers.
Usually the affected percentages are still at 100% for all three surfaces when only part of the room is wet, or the offsets counter has been used for shallow recesses. Both raise the count legitimately.
I turned the detailed method on for one chamber. Is it on for the others?
Yes. The switch sits inside a chamber's Equipment Recommendation card, but it is a Drylog-wide setting. Only the class factor varies from chamber to chamber.
Where do I set HVAC support?
On the Equipment Recommendation card, under the Detailed Method switch, labelled "HVAC assists drying". It is the one building condition that is not also in Site Information.
Related Articles
Still Need Help?
If you have questions or run into an issue, contact Albi Support and we will be happy to help.