
How Do I Document Site Conditions in DryLog?
Site Information records the conditions at the loss location — the weather outside, the type of building being dried, and a reference room that was not affected. It is the baseline your drying documentation is measured against.
Why This Matters
- It gives an adjuster the conditions you walked into, before any drying started.
- The unaffected room provides reference conditions to compare affected readings against.
- Four of the selections feed the equipment recommendations. See How Site Conditions Affect Equipment Recommendations below.
Editing Site Information
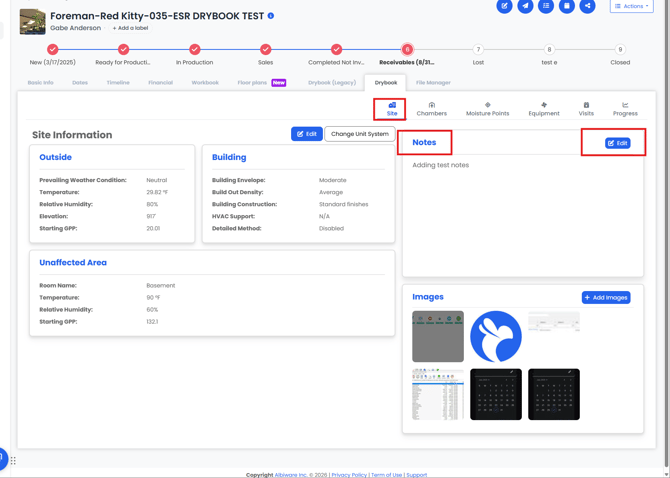
Open the DryLog tab on the project, then the Site sub-tab. Site sits alongside Chambers, Moisture Points, Equipment, Visits and Progress.
Click Edit on the Site Information card.
The Edit Site Info pane opens on the right.
Click Save when you are done, or Cancel to discard.
Note: The Change Unit System button beside Edit switches between imperial and metric. The field labels change with it — Temperature (°F) becomes (°C), Elevation (ft) becomes (m).
Outside
| Field | What it records |
|---|---|
| Prevailing Weather Condition | Whether the outdoor air is helping or hindering the dry. Favorable, Neutral or Unfavorable. |
| Temperature (°F) | Outside temperature. |
| Relative Humidity (%) | Outside relative humidity. |
| Elevation (ft) | Elevation at the loss location. |
Rather than entering these by hand, click the weather icon at the top right of the Outside section. Albi pulls the current conditions for the project address and fills the section in for you.
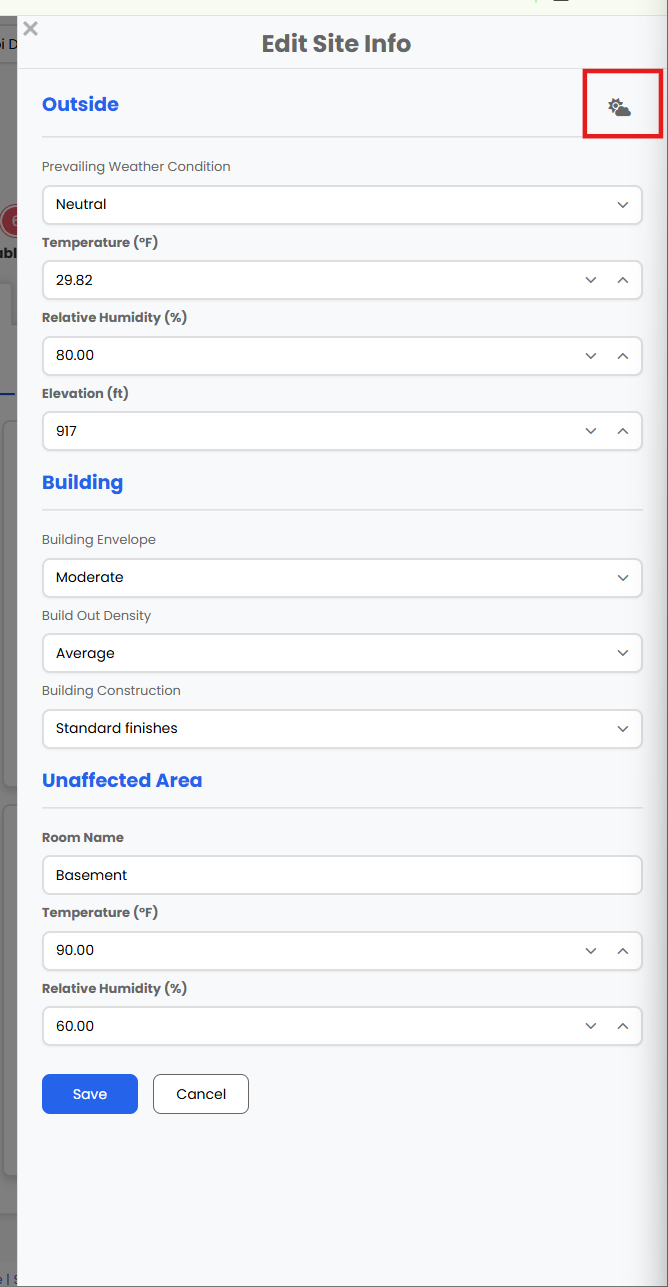
Note: The icon overwrites the prevailing weather condition, temperature and relative humidity. If you have already entered readings from your own meter, clicking it will replace them, so pull the weather first and adjust anything you measured yourself afterwards. Elevation is left as you set it. Nothing is committed until you click Save, so Cancel puts the original values back.
Note: It fetches conditions as they are at the moment you click it, not as they were when the loss happened. Use it while you are on site. If you are documenting a job after the fact, enter the readings by hand.
Starting GPP appears on the Outside card but is not something you type in. Albi calculates it from the readings you enter.
Building
| Field | Options |
|---|---|
| Building Envelope | Tight, Moderate, Loose |
| Build Out Density | Very open, Fairly open, Average, Dense |
| Building Construction | Standard finishes, High-end finishes |
What the options mean:
| Selection | Describes |
|---|---|
| Tight envelope | Outdoor conditions cannot get in |
| Moderate envelope | Lets some outdoor air in |
| Loose envelope | Not protected from the outdoors |
| Very open | Factory, warehouse, box store or theatre |
| Fairly open | School or open concept office |
| Average | Most homes or hotels |
| Dense | Medical office or closed office space |
| Standard finishes | Builder-grade wood or vinyl finishes |
| High-end finishes | Architectural-grade panelling, insulation, wood trim |
Two more rows appear on the Building card that you cannot set here:
- HVAC Support — set in the detailed method configurator, not in this form. It reads N/A until the detailed method is configured.
- Detailed Method — shows Enabled or Disabled for this DryLog. It is off by default.
Note: If a saved selection looks like it has changed name, it was renamed rather than cleared. "Fairly dense" is now Dense, "Poor" and "Average" are both now Standard finishes, and "Good" is now High-end finishes.
Unaffected Area
A single room that was not affected by the loss, recorded as reference conditions rather than as a description.
| Field | What it records |
|---|---|
| Room Name | The room being used as the reference, for example Basement |
| Temperature (°F) | Temperature in that room |
| Relative Humidity (%) | Relative humidity in that room |
As with Outside, Starting GPP is calculated and shown on the card.
How Site Conditions Affect Equipment Recommendations
Four of these selections are used twice. The Prevailing Weather Condition, Building Envelope, Build Out Density and Building Construction are the same stored values the detailed method uses when it sizes LGR dehumidification. Editing them here changes them in the equipment configurator too, and can change a chamber's required capacity.
This only applies when the detailed method is on for that DryLog. With it off, these selections are documentation only and the dehumidification requirement is unaffected.
Note: If you update site conditions partway through a job and the detailed method is on, expect the dehumidification figures to move. The Building card shows whether the detailed method is enabled, so you can check before editing.
For what each selection does to the requirement, and the multipliers behind it, see the equipment recommendations article.
Site Notes
The Notes card sits at the top right of the Site page. Click Edit on that card to write or update your site notes.
- Source of loss, for example burst pipe, roof leak or appliance failure
- How long the water was present before mitigation started
- Safety concerns, for example suspected mould or electrical hazards
- Anything else relevant to the drying strategy
- Which parts of the property are unaffected, beyond the single reference room recorded above
Tip: These notes are what you will lean on when explaining to an adjuster or a customer what the situation looked like at the start of mitigation.
Site Images
The Images card sits below Notes on the right of the Site page. Click + Add Images to open the Add Images panel.
There are two ways to add photos:
- Upload files — drag and drop onto the drop zone, or click to browse your device
- From project files — pick images already attached elsewhere on the project, without uploading them a second time
Use the Tags field to categorise what you are adding, for example "Kitchen Day 1" or "Living Room Before Demo". Start typing to reuse an existing tag or create a new one.
Everything you have staged appears under Attached, with an × beside each file if you change your mind. Click Add to finish, or Cancel to discard.
Photos here are used to:
- Show conditions before and after
- Evidence the extent of the damage
- Support the scope of work and the equipment placed
Note: Images uploaded in DryLog are saved automatically to the DryLog folder in the project's File Manager tab.
Frequently Asked Questions
My dehumidification requirement changed after I edited site conditions.
Expected if the detailed method is on. The weather, envelope, density and construction selections are shared with the equipment configurator, so editing them here re-sizes dehumidification. With the detailed method off, these selections do not affect the requirement.
Where do I set HVAC Support?
In the detailed method configurator, not in this form. It appears on the Building card for reference and reads N/A until it has been set.
Why can't I edit Starting GPP?
It is calculated from the readings you enter, so there is nothing to type. Change the temperature or relative humidity and it updates.
My saved density or construction option has a different name.
It was renamed, not cleared. "Fairly dense" is now Dense, "Poor" and "Average" are now Standard finishes, and "Good" is now High-end finishes.
Where do I record the source of loss or a safety concern?
In Site Notes. The site information form holds conditions and readings only.
The Unaffected Area only lets me enter one room.
That is by design — it records one room's conditions as a reference point. If more of the property is unaffected, describe it in Site Notes.
Can Albi fill in the outside conditions for me?
Yes. Click the weather icon at the top right of the Outside section and Albi pulls the current conditions for the project address. Do it before you type anything, because it overwrites the weather condition, temperature and relative humidity already in the section. Elevation is left alone. It also reflects the weather at the moment you click it, so enter the readings by hand if you are documenting the job later.
I clicked the weather icon and my readings changed.
The icon overwrites the weather condition, temperature and relative humidity with current conditions for the project address, including anything you had typed. Elevation is not affected. If you have not saved yet, Cancel puts the original values back. Once you have saved, re-enter the readings — and pull the weather before typing next time.
Can I work in metric?
Yes. Use Change Unit System beside the Edit button. The field labels change with it.
Related Articles
- How Do I Track Equipment and Use Equipment Recommendations in DryLog?
- How Do I Log Visits and Track Drying Progress in DryLog?
Still Need Help?
If you have questions or run into an issue, contact Albi Support and we will be happy to help.