
Before You Start
You'll need:
- Admin access in Albi — users will need the role permission 'manage settings' to manage integrations.
- QBO admin or Master Admin credentials — the QBO user who authorizes the connection must have permission to grant access to third-party apps.
- An active QuickBooks Online subscription.
- About 10–15 minutes for initial setup, plus a few minutes to verify your first synced project.
Tip: If your team uses both QuickBooks Desktop and QuickBooks Online for different entities, make sure you're connecting the right environment. Albi can only connect to one QuickBooks instance at a time.
Step 1: Connect Albi to QuickBooks Online
- In Albi, navigate to Settings → Integrations.
- Find QuickBooks in the list of available integrations and click on the card.
- You'll be redirected to QuickBooks Online. Sign in with the QBO admin account you want to authorize the connection.
- Review the permissions Albi is requesting and click Connect to authorize.
- You'll be redirected back to Albi. The QuickBooks integration card should now show a Connected badge.


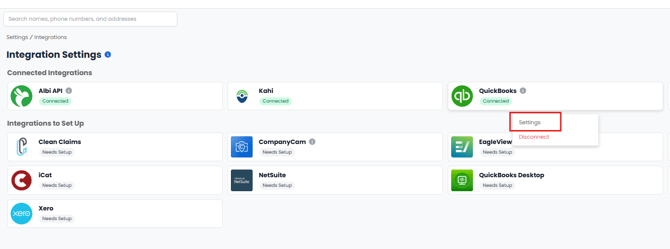
Step 2: Configure Your QuickBooks Settings
After connecting, you'll need to configure how Albi syncs with QBO. From the Integrations page, click Settings on the QuickBooks card to open the QuickBooks Settings panel.

Walk through each setting below.
Customer Condition (Sync Trigger)
The Customer Condition dropdown controls when a new Albi project syncs to QBO. Choose the option that matches your team's billing workflow:
- Everytime Project Created — every project pushes to QBO the moment it's created.
- Certain Statuses — projects sync only when they reach one of the project statuses you select. This is multi-select, so you can pick multiple statuses (for example, "Sales" and "In Production"). A project hitting any of the selected statuses will trigger the sync.
- Certain Dates — projects sync when a specific project date field has a value entered. Choose which date field acts as the trigger from the dropdown.
Note on pre-sync financials: Once a project syncs to QBO, you can no longer create native invoices or payments for that project inside Albi. If you choose Certain Statuses or Certain Dates as your Customer Condition, projects will exist in Albi for some time before they sync — and any invoices or payments you create natively in Albi during that pre-sync window will not push to QBO when the project syncs later. See the orphan-records warning in the Overview article for more detail.
Bill Sub Customer to Parent
This toggle controls how QBO handles billing for projects (Sub-Customers):
- Yes — invoices for the project roll up to the parent Customer in QBO. Useful when one customer has multiple jobs and you want a consolidated billing view at the customer level.
- No — invoices stay attached to the specific Sub-Customer (the project). Useful when each project is billed and tracked independently.
Choose the setting that matches how your accounting team prefers to bill.
QBO Payment Account for Transaction Fees
Select the QBO account that should record transaction fees. This setting is required for payment syncing to work properly.
Note: This field is only required if your company uses Albi Pay for in-app payment processing. If you don't use Albi Pay, you can leave it blank.
QBO Expense Account for Transaction Fees
Select the QBO expense account that should categorize transaction-fee expenses. If you don't have an appropriate account in QBO yet, click Create Account to create one without leaving Albi.
Imported Account Subtypes for Expenses
This multi-select list controls which QBO expenses sync into Albi. Only expenses associated with the account subtypes you select here will pull into the Albi Expense Table.
You must select at least one account subtype for expense syncing to function. Albi will pre-populate this list with common defaults — review the list and add or remove subtypes to match your accounting setup.
Tip: If you notice that some expenses aren't pulling from QBO into Albi, this list is the first place to check. Any expense whose account subtype isn't selected here will not sync into Albi — even though it exists in QBO.
Save Your Settings
Once your settings look right, click Save at the bottom of the panel.
Step 3: Verify Your Connection
The cleanest way to confirm the integration is working is to create a project and watch it sync to QBO.
- Open or create a project that meets your Customer Condition (for example, if you chose Certain Statuses → "Sales", set a project to that status).
- Wait a moment for the sync to process.
- On the project's Basic Info tab, look for the QuickBooks ID field — this should populate with the QBO Sub-Customer ID once the sync completes.
- Click the Integrations button at the top right of the project — you'll see the QuickBooks connection listed along with the project name as it appears in QBO.
- Check QBO directly — log in to QuickBooks Online and confirm the Sub-Customer appears under the parent Customer in your Customers list.


If the QuickBooks ID doesn't appear after a few minutes, see Manual Sync below.
Day-to-Day: Using the Integration
Where to Create Financials
Once a project is synced to QBO, all financial records are created in QuickBooks Online, not in Albi:
- Invoices — create in QBO against the project's Sub-Customer.
- Payments — create in QBO against the project's Sub-Customer.
- Expenses, Credit Memos, Sales Receipts, Bank Deposits — all originate in QBO against the project's Sub-Customer and pull into Albi.
For a complete breakdown, see the What Syncs and In Which Direction table in the Overview article.
Finding a Project's QuickBooks ID
There are two places to find the QBO ID for a project — useful when you need to confirm a project is connected, or when something doesn't look right and you want to check the link:
- The project's Basic Info tab — the QuickBooks ID field.
- The Integrations button at the top right of the project — opens a popover with the linked QBO record.
Manually Syncing a Project
If a project should have synced but the QuickBooks ID still hasn't appeared, you can trigger a manual sync:
- Open the project.
- Navigate to the Financials tab.
- Click the manual sync button.

A manual sync helps when a sync didn't go through automatically — for example, after a brief network or QBO connection issue. If repeated manual syncs don't resolve the issue, head to the Troubleshooting & FAQ article.
How to Disconnect
You can disconnect QBO from Albi at any time. Read this section carefully before doing so — disconnecting changes how data flows between the two systems.
- Navigate to Settings → Integrations.
- Find the QuickBooks card and click Configure.
- Click Disconnect at the bottom of the settings panel.
- Confirm in the confirmation dialog.
What happens when you disconnect: Already-synced records remain in both Albi and QBO — disconnecting does not delete or unlink any existing data. However, no new transactions will sync between the two systems until you reconnect.
What's Next
- Run into an issue? Read QuickBooks Online: Troubleshooting & FAQ.
- Want to revisit the conceptual overview? Read Connecting Albi to QuickBooks Online: An Overview.