
What does “Clocking In” mean?
Clocking in tracks the time you spend working on a specific project. Once you clock in, your work time is recorded until you clock out or take a break.
How to Clock In
When you first open the Clock tab and are not clocked in, you will see the Clock In screen.
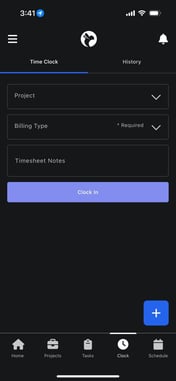
You must complete the following steps:
- Select a Project
- Tap the Project field.
- Search for and select the project you are working on.
- This ensures your time is tied to the correct job.
- Select a Billing Type (Required)
- This step is mandatory.
- Choose the type of hours you are working, such as:
- Regular Time
- After Hours
- Emergency Time (if applicable)
- Selecting the correct billing type ensures accurate payroll, billing, and reporting.
- Add Timesheet Notes (Optional but Recommended)
- Use this field to briefly describe what you are working on.
- Example:
- “Initial inspection”
- “Equipment setup”
- “Monitoring drying progress”
- These notes help supervisors and office staff understand what was done during that time.
- Tap Clock In
- Once you clock in, time tracking begins immediately.
You will see a confirmation message letting you know you have clocked in successfully.
Active Time Clock Dashboard (While Clocked In)
Once you are clocked in, the screen changes to the Active Clock Dashboard. This dashboard gives you a live view of your current work session.
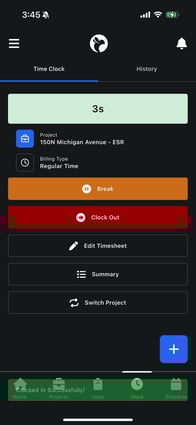
What You’ll See
- Live Timer
- Shows how long you have been clocked in.
- Updates in real time.
- Current Project
- Displays the project you are clocked into.
- Billing Type
- Shows the type of hours currently being logged.
This screen acts as your control center while you’re working.