
The Tasks section in the Albi mobile app is your personal task dashboard. It shows all work items that are assigned to you, allowing you to easily track what you need to do, what you’re currently working on, and what has already been completed.
Tasks help keep projects organized, ensure follow-ups are not missed, and give visibility into work progress for both field and office staff.
You can access Tasks at any time by tapping the Tasks icon in the bottom navigation bar of the mobile app.
Task Dashboard Layout
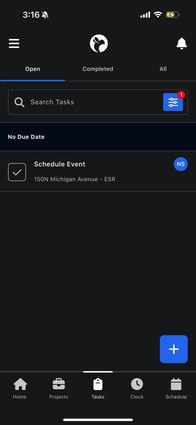
When you open the Tasks section, you will see a dashboard with three main tabs at the top:
Open
Shows all tasks that are:
- Assigned to you
- Not yet completed
These are the tasks you are expected to work on.
Completed
Shows tasks that have:
- Been marked as completed
- Passed their due date (past due tasks will still appear here for reference)
This helps you review finished work and identify overdue items.
All
Shows every task assigned to you, regardless of status.
Searching and Filtering Tasks
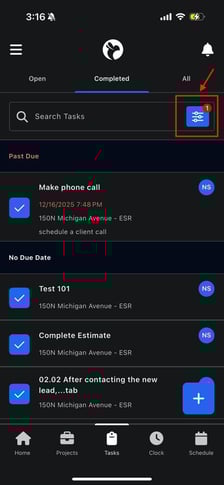
Search Tasks
At the top of the screen, there is a Search Tasks bar.
- Use this to quickly find tasks by name or related project
- Helpful when you have many tasks assigned
Filter Tasks
Next to the search bar is the filter icon.
Using filters, you can narrow down tasks based on:
- Status
- Due date
- Other task attributes (depending on your setup)
This allows you to focus only on the tasks relevant to your current workload.
Understanding Task Cards
Each task in the list is displayed as a task card, which includes:
- Task name
- Associated project name
- Due date and time (if set)
- Assigned staff initials
- Status indicator
No Due Date vs Past Due
- Tasks without a due date appear under No Due Date
- Tasks that have missed their due date appear as Past Due (highlighted for visibility)
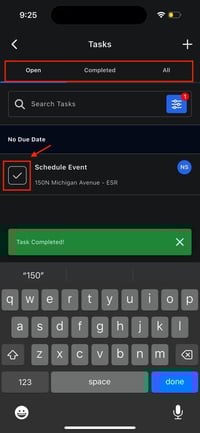
Updating Task Status from the Dashboard
Marking a Task In Progress
In the Open tab:
- Tap the checkmark icon (✓) on a task
- The task moves from To-Do to In Progress
This signals that work has started.
Completing a Task
- Tap the checkmark (✓) again
- The task is marked as Completed
- It will move to the Completed tab
This provides clear visibility that the task has been finished.
Viewing Task Details (Task Info)
To see full details about a task:
- Tap anywhere on the task card (not the checkmark)
This opens the Task Info screen.
Task Info Screen Includes:
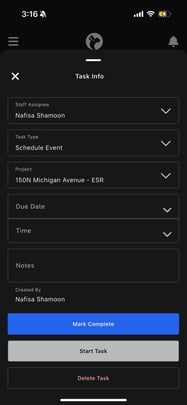
- Staff Assignee – who the task is assigned to
- Task Type – what kind of task it is (e.g., call, schedule event, follow-up)
- Linked Project – the project the task belongs to
- Due Date and Time
- Notes – additional instructions or context
- Created By – who created the task
Available Actions
From the Task Info screen, you can:
- Tap Start Task to mark it in progress
- Tap Mark Complete to finish the task
- Tap Delete Task (if permissions allow)
Creating a New Task
You can create a new task directly from the Tasks dashboard.
How to Create a Task
- Tap the blue + (Add) button


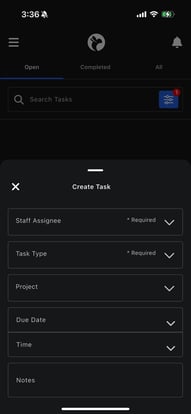
2. Select Create Task
3. Fill in the required fields:
-
- Staff Assignee – who will complete the task
- Task Type – defines the type of work
5. Tap Save
Once saved, the task appears immediately in the assigned user’s task list.