
Connecting Albi to NetSuite takes three pieces of information from your NetSuite account: your Account ID, a Client ID, and a Client Secret. This article walks you through finding each one, preparing the NetSuite role you'll sign in with, authorizing the connection from Albi, and turning on automatic renewal so the connection keeps running on its own.
Setup happens mostly in NetSuite, so we recommend having a NetSuite administrator complete these steps.
Before You Begin
Make sure you have the following in place:
- Access to Albi's integration settings (Settings → Integrations).
- A NetSuite user who is an Administrator, or who has the Integration Application permission. Without one of these, the option to create an integration record won't appear in NetSuite.
- The OAuth 2.0 and REST Web Services features enabled in NetSuite. You can turn both on under Setup → Company → Enable Features → SuiteCloud
Step 1: Find Your NetSuite Account ID
Your Account ID is part of the web address you see when you're logged into NetSuite.
For a standard (production) account, the Account ID is the number at the start of the URL.
For Sandbox and Release Preview accounts, the Account ID includes an underscore and a suffix (_SB or _RP). NetSuite changes that underscore to a hyphen and makes the letters lowercase in the URL, but you'll enter the Account ID into Albi in its original format, with the underscore.
| Account type | Your NetSuite URL looks like | Account ID to enter in Albi |
|---|---|---|
| Standard | https://1234567.app.netsuite.com |
1234567 |
| Sandbox | https://1234567-sb.app.netsuite.com |
1234567_SB |
| Release Preview | https://1234567-rp.app.netsuite.com |
1234567_RP |
Step 2: Create an Integration Record in NetSuite
The integration record is what generates your Client ID and Client Secret.
- In NetSuite, go to Setup → Integration → Manage Integrations → New.
- Enter a Name for the integration, such as Albi Integration.
- Set State to Enabled.
- Open the Authentication subtab and scroll to the OAuth 2.0 section.
- Select the following:
- Authorization Code Grant
- Client Credentials (Machine to Machine) Grant. This is required for automatic renewal (see Step 5). You don't need to upload a certificate yourself; Albi creates and uploads it for you.
- Set Refresh Token Validity to 720 hours (the maximum). See Keeping Your Connection Active for what this means.
- In the Redirect URI field, enter:
https://app.albiware.com/Settings/Integration/NetSuite/AuthenticationCallBack - Under Scope, select REST Web Services only. No other scopes are needed.
- Click Save.
Important: After you save, NetSuite shows your Client ID and Client Secret only once. They can't be retrieved again later. Copy both values right away and store them somewhere secure. You'll need them now in Albi, and again if you ever disconnect and reconnect the integration.
Step 3: Check the NetSuite User and Role You'll Authorize With
When you connect, you'll sign in to NetSuite and choose a role. The connection is tied to that NetSuite user and role, so choose them carefully.
We recommend connecting with a NetSuite user that has the Administrator role. Ideally, this is a dedicated integration user rather than a person's own account. If the user who authorized the connection is later deactivated or loses their role, syncing stops.
Whichever role you use, make sure it includes:
- Log in using OAuth 2.0 Access Tokens. This lets NetSuite authorize Albi.
- REST Web Services (under Setup). Albi communicates with NetSuite through this, so without it the connection will succeed but syncing will fail.
- Integration Application (under Setup), if you're using a custom role for the integration. This is needed to manage or view integration records.
- OAuth 2.0 Authorized Applications Management (optional). Add this if you want users with this role to be able to view or revoke authorized integrations.
If your security policy doesn't allow using the Administrator role, use a custom role with the permissions above, plus these record permissions:
- Full access to Customers and Projects. Albi creates and updates these records; it doesn't delete them.
- View access to Invoices, Employees, Locations, Classes, Departments, Subsidiaries, and Customer Status.
For more detail on setting up roles for OAuth 2.0, see NetSuite's help article on setting up OAuth 2.0 roles.
Step 4: Enter Your Credentials in Albi and Authorize
- Log in to Albi and go to Settings → Integrations → NetSuite.
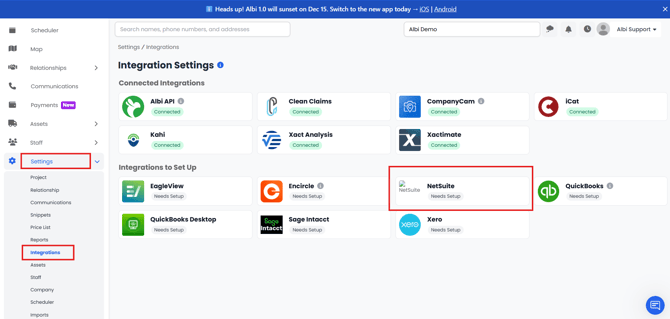
- If the integration shows Needs Setup, click into it.
- Enter your NetSuite Account ID, Client ID, and Client Secret.
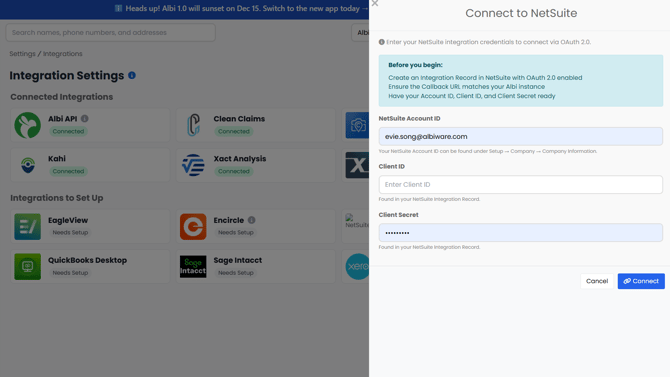
- Click Connect. You'll be sent to NetSuite to sign in.
- Log in to NetSuite as the user you chose in Step 3. You may be asked to complete multi-factor authentication.
- Review the consent page, which describes the access Albi is requesting.
- Select the role you checked in Step 3, then accept.
- NetSuite sends you back to Albi, and the integration is connected.
Step 5: Turn On Machine-to-Machine (M2M) Access (Recommended)
By default, the NetSuite connection expires every 30 days and someone has to sign in again. Turning on machine-to-machine (M2M) access removes that step: Albi renews its access automatically, and syncing keeps running without anyone signing in.
Before you start, make sure:
- Client Credentials (Machine to Machine) Grant is checked on your integration record (Step 2).
- You've finished connecting in Step 4.
To turn on M2M access:
- In Albi, go to Settings → Integrations → NetSuite.
- In the Machine-to-machine (M2M) access panel, click Enable M2M.
- Wait for the confirmation message. The panel will show Connected.
Albi creates a security certificate, uploads it to NetSuite, and checks that it works. You don't need to create or upload anything yourself. If you'd like to see the certificate in NetSuite, go to Setup → Integration → Manage Authentication → OAuth 2.0 Client Credentials (M2M) Setup.
Good to know:
- M2M is tied to the NetSuite user who connected, not the Albi user who clicked Enable M2M. This is why we recommend a dedicated integration user in Step 3.
- Certificates renew automatically. NetSuite certificates are valid for 2 years, and Albi renews yours during the last 30 days before it expires. No action is needed.
- To turn M2M off, disconnect the integration in Albi. Disconnecting also removes the certificate from NetSuite.
Keeping Your Connection Active
If M2M access is on, you don't need to do anything. Albi renews its access on its own.
If M2M access is off, the connection expires after 30 days. To keep syncing, disconnect and reconnect the integration in Albi using your Client ID and Client Secret. You can turn on M2M access at any time (see Step 5) to avoid this.
If the NetSuite user who connected is deactivated or loses their role, syncing stops, even with M2M access on. To fix it, disconnect the integration in Albi, reconnect while signed in to NetSuite as an active user with the required role, and click Enable M2M again.
Troubleshooting
I don't see Manage Integrations → New in NetSuite.
Your NetSuite user needs to be an Administrator or have the Integration Application permission. Ask your NetSuite administrator to add it.
The connection fails during sign-in.
The role you selected during sign-in is most likely missing a required permission. Review the list in Step 3, update the role, and try connecting again. Also confirm that the OAuth 2.0 and REST Web Services features are enabled in NetSuite.
The integration says it's connected, but data isn't syncing.
Check that the role you connected with has the REST Web Services permission and the record permissions listed in Step 3.
Syncing stopped after someone left the company or changed roles.
The connection is tied to the NetSuite user who authorized it. Disconnect and reconnect as an active user with the required role, then click Enable M2M again. See Keeping Your Connection Active.
I see "NetSuite rejected the machine-to-machine token."
Make sure Client Credentials (Machine to Machine) Grant is checked on your integration record in NetSuite, then try again.
I'm connecting a Sandbox or Release Preview account.
Make sure you entered the Account ID with the underscore (for example, 1234567_SB), not the hyphen version from the URL.
Important: Don't revoke Albi's certificate on NetSuite's M2M Setup page while the integration is in use. Doing so stops syncing until you disconnect and reconnect.